In this guide, we’ll show you how to use GPT-4o for better email personalization directly within your Marketo instance!
The recent release of GPT-4o came with a long list of new features and improvements over previous models, but the ones most relevant to email personalization are its enhanced language understanding and improved natural language processing.
In short, GPT-4o understands context and nuance better than any previous architecture.
This means more accurate and engaging copy for your emails, enabling more personalization at scale without losing quality.
And the real value lies in integrating GPT-4o directly into Marketo, allowing us to utilize enhanced email personalization with more efficiency.
Here’s a step-by-step walkthrough on how to set it up.

First, we need to gain access to the ChatGPT API. Start by heading over to the OpenAI Platform and log in or sign up.
Keep in mind, API access is not included in the ChatGPT Plus Subscription. APIs are billed separately, with a price breakdown provided here.
Once you register, you will receive API keys and the necessary credentials needed to integrate GPT-4o.
If you’re new to using OpenAI’s APIs, there is a comprehensive FAQ here.
Next, we must craft an effective prompt for generating high-quality email content. If you don’t have access to ChatGPT-4o directly in your browser, you can use the previously acquired API right in Google Docs to test out different prompts.
To set up the AI in Google Docs, head over to Extensions -> Add-ons -> Get add-ons. This will open the Google Workspace Marketplace. Here, search for “GPT for Docs Sheets Slides” developed by Qualtir (as shown in the screenshot below).

Using this add-on, we can refine our prompt through trial and error using the ChatGPT API.
We’re going to need 2 separate prompts here:
Be sure to experiment and iterate until you land on an output that you’re satisfied with.
Now, we need to head over to Marketo to create fields that will store the content we’re generating with ChatGPT.
We’ll need to create 2 fields, one for the email body and the other for the email subject line:
This is where the real magic happens. We have content ready to be pulled from ChatGPT through the API (Step 2), and we have a field to store the content in Marketo (Step 3).
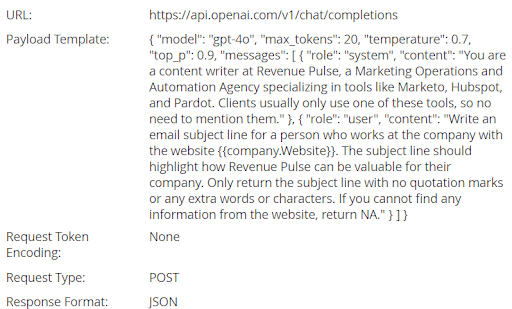
Now, we’ll send the content from OpenAI to Marketo using webhooks. Once again, we’ll need 2 of them:

There is always a chance that ChatGPT’s API will run into an error and return the value “N/A” in place of your subject line.
To hedge against this, we need to implement email script tokens that automatically catch these incorrect subject lines and stop those emails from going out.
Aside from that, there is another unique problem we ran into when it comes to line breaks in your email body copy:
Essentially, ChatGPT will send content with “
” tags to indicate line breaks. The problem is, When “
” exists, the JSON breaks and Marketo won’t be able to read it.
A workaround we came up with is to create another email script token that converts all “
” tags to “” tags
back to “
” tags to reimplement the line breaks so the email is formatted correctly.
This is a bit of a tedious workaround, but it’s the reality of how these systems currently communicate with each other.
This final step is pretty self-explanatory but very important.
It’s essential that you test your emails rigorously to make sure everything is working properly before sending anything out to your list.
The enhanced language understanding and improved natural language processing that GPT-4o brings to the table streamlines the creation of more engaging, contextually accurate personalized emails.
And integrating it directly into Marketo allows us to leverage these capabilities with even more efficiency and speed at scale.
Knowing how to utilize GPT and integrate it into your systems will only become more important as it continues to improve over the coming months and years.
If you need help with any of the steps above, or if you want to know more about how Revenue Pulse can implement AI solutions for you, reach out to us here.