Do all of your marketing emails, landing pages, and other assets still say “Copyright © 2023” at the bottom?
Keeping your copyright year up to date goes a long way for maintaining brand professionalism and consistency.
But we are well into February now, and plenty of companies still haven’t updated the copyright year to 2024 in their Marketo instance yet.
Or maybe they did, but they had to go through each email and landing page and edit them manually — one at a time.
There must be a better way, right?
We’re going to walk you through 2 different methods to automate this entire process using Marketo tokens.
And there’s no coding experience needed for these. We’ve done our best to break them down into simplified steps that are easy to follow.
Method 1:
A Single Token Across All Assets.
This first method is to create a token at the top-level folder in your Marketo instance — allowing it to impact every asset within.
Step 1) Navigate to the left side of your Marketo instance and find the top-level folder that contains all of your programs.

Step 2) In this top-level folder, select the “My Tokens” tab and create a new token by navigating to the right side of the screen and dragging in a “Text” token.
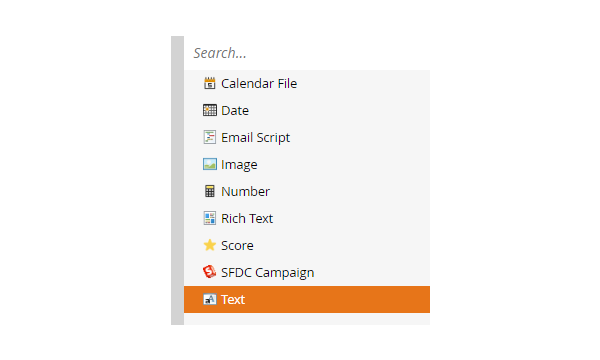
Step 3) Change the Token Name to {{my.Current Year}} and set the Value to 2024. It should look like this when you’re done:

Step 4) If you don’t currently have a token in each of your assets, you’ll need to swap out the hard-coded date (2023 in this case) and add the token there instead – as shown in the screenshots below.
Before (hard-coded):

After (token):

And that’s it!
While this method is incredibly straightforward, it does come with some drawbacks.
The most glaring issue is that you still need to remember to update the “Year” value of this token every January 1st. This may seem easy enough, but we’ve seen countless organizations (big and small) forget about it for months.
Which brings us to our second (and superior) method.
Method 2:
Set It and Forget It.
This is our preferred method, because while it requires a little more upfront work, you will never have to worry about updating your asset copyright year again.
It’s a completely automated, self-updating setup that you can forget about once it’s running.
Step 1) Navigate over to the same top-level folder as Method 1 (the main folder that holds all of your other programs).
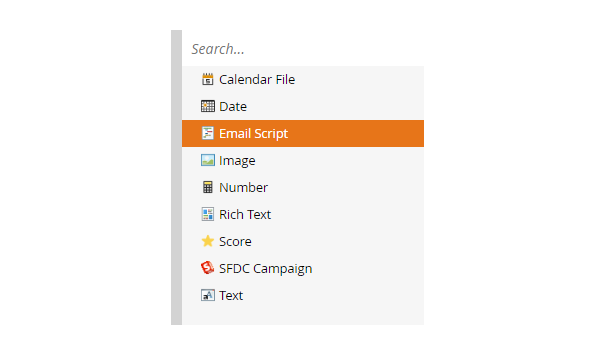
Step 2) With the “My Tokens” tab selected, go to the right side of your Marketo instance and drag in an “Email Script” token.
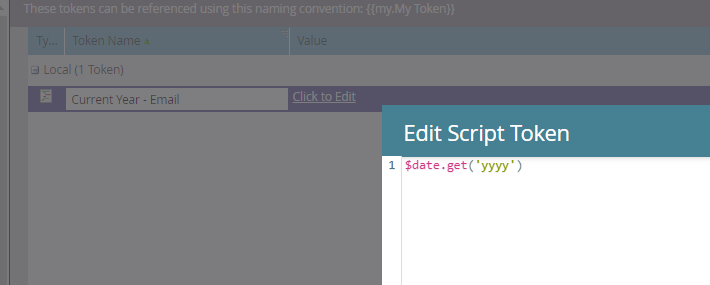
Step 3) Change the Token Name to {{my.Current Year – Email}}.
Step 4) For the Value of the token, press “Click to edit” which will open up a new window titled “Edit Script Token”. Here, paste the following:
$date.get(‘yyyy’)Then press save. This short script dynamically updates the year based on the server's current date.
Step 5) Drag in another token from the right side, this time use the one called “Text”.

Step 6) Change this Token Name to {{my.Current Year - LP}}.
Step 7) In the Value section paste the following:
<script>(document.currentScript || document.scripts[document.scripts.length - 1]).outerHTML = new Date().getFullYear();</script>
This JavaScript code fetches the current year from the user's computer, ensuring the displayed year is always accurate.
Now you have 2 different tokens set up for each asset type (Emails and Landing Pages) that will automatically update the copyright year.


While Method 2 does have a few extra steps involved, the entire process should only take five minutes or so.
A worthy tradeoff for never having to remember to update your copyright year again – and keeping the copyright year current reflects well on your brand’s attention to detail!
Below are a few examples of what the end result should look like.
Email example:

Landing Page example:

If you want to explore a more robust setup of the same solution, check out Sanford’s blog post which taught me how to solve this challenge years ago here (Marketo-hosted version here).
His method goes into greater detail, and has an extra setup for dealing with time zone differences over the first day of each year.
We hope this was helpful!
And if your team needs assistance with more complex projects, we’re happy to chat when you’re ready.


