In this guide, we’ll show you exactly how to create a fine-tuned GPT model that’s integrated directly into Marketo for enhanced persona classification.
Persona classification plays a crucial role in successfully delivering targeted and personalized content to your audience.
However, traditional classification methods often fall short due to the dynamic nature of job titles, industry terms, and other parameters.
For example, Persona A may include a job title with the word “Tech”. Then, some months or even years later, that same job title drops “Tech” and uses “IT” in the title instead. This can be true for several different job titles and even entire industries.
All these words and terms must be constantly updated for your personas to accurately reflect the roles you want to target – and this takes a lot of manual work.
Put simply, marketers spend a lot of time defining personas only for them to quickly become outdated.
The good news is, we can create our own fine-tuned GPT that understands the patterns of these term changes.
It can take “Technology Analyst” and “IT Analyst” and feed them into the same group, for example. Then, when a new term like “Python” comes up in a job title, it’ll understand where to categorize that role based on your existing persona instructions and examples.
And since we’ll be training our model on job titles and industry terms rather than actual private identifiers, this application of GPT has no privacy or compliance risks whatsoever.
Here’s our guide on how to set it up!
(This guide is for tech professionals and enthusiasts who use Marketo. Not a lot of coding is required, but it would help to know coding basics or be willing to learn!)
Before we get into the technical aspects of tuning your GPT model and integrating it with Marketo:
None of this will be very useful if you haven’t already taken the time to define your personas.
This almost goes without saying, but we still wanted to quickly mention it.
Defined persona groups based on job title, industry, pain points, and other characteristics are information that your fine-tuned GPT will need in order to automatically update and recategorize contacts when terms change.
The first thing we need to do is prepare our data for fine-tuning. Let’s walk through what that looks like.
How to convert your data to JSONL format

Important note: Take 80% of your data (if you have 600 rows, then take 480 rows) and put that into one .txt file, then take the remaining 20% of your data (120 rows) and paste those into a second .txt file. We do this because we want two separate JSONLs: One for training (80% of our data) and one for testing (20% of our data).
We do this because GPT will not only train itself on the larger file but will also optimize itself using the test file as a reference – leading to better performance and results.
Now that our data is cleaned and formatted into 2 JSONL files (one for training, one for testing), we can send it to the OpenAI API to fine-tune our GPT model.
If you want, you can check out OpenAI’s extensive tutorial on how to create a fine-tuned model here. But we will quickly walk you through the basic, high-level steps.
import openai
openai.api_key = ""
openai.File.create(
  file=open(r"train_file_path", "rb"),
  purpose='fine-tune'
)
openai.File.create(
  file=open(r"test_file_path", "rb"),
  purpose='fine-tune'
)
openai.File.retrieve("Train-File-ID"),openai.File.retrieve("Test-File-ID")
openai.FineTuningJob.create(training_file="Train-File-ID", validation_file= "Test-File-ID", model="gpt-3.5-turbo or gpt-4o-mini")
openai.FineTuningJob.retrieve("FT-ID")
completion = openai.ChatCompletion.create(
  model="MODEL_ID",
  temperature=0,
  max_tokens=100,
  messages=[
    {"role": "user", "content": "Your Test Message"}
  ]
)
print(completion.choices[0])
Note: When creating a fine-tuned model, we are currently limited to GPT 3.5 turbo and GPT4o Mini.
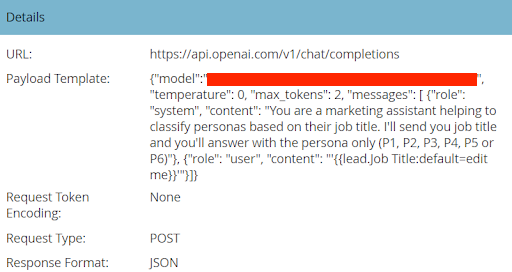
Our fine-tuned GPT model is now ready to be integrated with Marketo. This is a relatively short step that involves creating a webhook in Marketo (which we covered in Step 4 of this guide) with the following fields:
So we have our fine-tuned GPT model set up (Step 2) and we have our webhook in Marketo created (Step 3). Now we’ll set up some automation in Marketo to use them together.
We’ll do this by creating a smart campaign in Marketo that will be triggered when a new lead is created or when lead information changes.
Once triggered, the smart campaign will send the information via webhook to the fine-tuned GPT, which will respond with the correct persona type (A, B, C, or whatever signifiers you used in your JSONL files).
Finally, if the persona for that lead has changed, the lead record will be automatically updated with the new classification.
Smart List:

Flow:

Outcome:

When all of this is set up properly, you will have an automatically updating field in Marketo for each lead that will signify which persona they fit into.
Note: This entire process is not limited to the language you are working in either. It can apply to any language worldwide.

The upfront work required to set this up is definitely worth it in the long run.
By leveraging a fine-tuned GPT model with proper integration and automation in Marketo, your persona classifications will be far more accurate and up to date, with minimal manual intervention required.
Ultimately, this will improve the effectiveness of your campaigns through better targeting, while freeing up more time for strategic and creative thinking.
And if you need help setting this up or have any other questions about how AI can improve marketing operations efficiency, send us a message here!